Rex Nye from independent builders’ merchant D.W. Nye offers his top tips for creating beautiful borders and eye-catching edging in your garden.
Whether you’re looking to give your garden a complete makeover or simply want to spruce it up for the summer months, creating beautiful borders or adding eye-catching edging are great ways to add definition and style to any outdoor space.
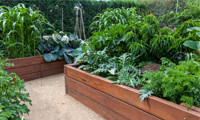
For those who are disabled or struggle to bend, maintaining planted beds can be incredibly difficult. Raised beds not only add interest and elegance, but are ideal for creating practical areas that can be easily looked after.
From natural sandstone to reclaimed wooden sleepers, there are numerous ways to enhance and tailor borders so you can admire and enjoy them all year round.
It’s all in the planning!
If you’re planning on a complete overhaul, first think about where you want to position your borders. Take into consideration the amount of sun and shade available throughout the day as this will impact plant growth. If you will be tending to borders in a seated position, then ideally they should be no more than 70cms high and 50cms deep.
There’s a huge choice of materials available for creating border walls including bricks, reclaimed stone, concrete slabs, timber posts and railway sleepers. Once you’ve worked out which one you want, mark out your chosen area using posts and string. A line of spray paint along the line is a good way to guide you when creating the border edge.
Get going with the groundwork
Once the border is prepped, you can start digging out the ground in your bedding area, and clearing clumps and stones.
If you are using concrete slabs, stones or bricks to build a raised bed, dig a foundation trench along your border line up to 15cms deep – this will help to add strength and stability. If you are creating a non-timber wall, the foundation should sit on concrete (except where there are vertical posts being installed).
Wooden walls won’t require a concrete foundation, however you’ll need to place stakes at regular intervals making sure that 50% of their length is buried below the ground. Bear this in mind when cutting your material to the length and height required. Pressure-treated timber is the most durable and will ensure your wooden wall stays looking smart for years to come.
Build your borders
If you’re working with horizontal timber boards, first fix stakes in each corner and then at 100cm gaps to support the panels.
Place your first panel into position against the stakes - one third should sit below the ground. Use non-corrosive nails to fix the timber to the posts and check with a spirit level along the entire length to ensure it’s not sloping. Panels can then be butted against each other to build up the height.
Railway sleepers should be fixed to stakes with long bolts. They will also require interlocking dowels to keep them seamlessly sitting on top of each other.
Add a layer of hardcore
Once the sides have been constructed it is advisable to line the inside with a polythene sheet to protect the material from the damp soil. Once this has been done, place a layer of stones or hardcore inside the raised bed, up to 8cms in depth. This will aid drainage and help plants to flourish. Cover with a permeable membrane and replace any topsoil that was previously removed, adding fertiliser and compost to improve soil quality.
Prepare to plant
Once your raised bed has been created, leave the soil to settle and enrich for up to 2 weeks before planting. The soil in your beds will lose moisture more quickly which means the ground will dry out if you forget to water it. Start by planting hardy annuals at first and take time to monitor the soil condition so you can select the right foliage.